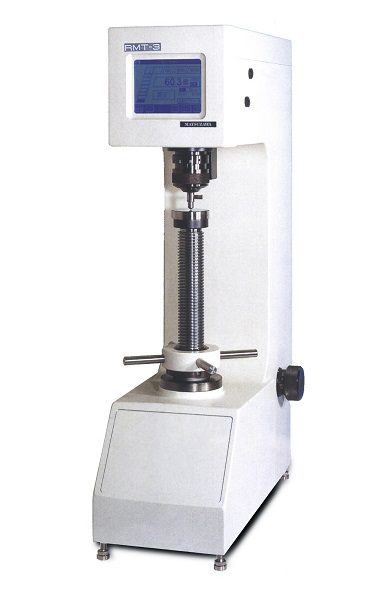
–>LIQUID CRYSTAL DISPLAY TOUCH-PANEL
Loaded with a LCD display with backlight. The hardness tester secures very clear and high visibility
–>AUTO START
After setting the reference load, the test load is applied automatically . (Manual start is also possible)
–>EASY SETTING
Reference load can be easily set with a bar graph display on the bright screen and electronic sound. More over, an error-preventing device is also mounted.
–>PLASTIC MEASURING SYSTEM
Specific measuring method for plastic in compliance with ASTM and JIS is activated by one-touch easy operation. Time for reading the value after unloading the test load can be set freely
–>VARIOUS DATA PROCESSING FUNCTIONS
It makes acceptance and rejection judgement, conversion to other scales, and tabulation and computing for data memory (256 data), maximum value, minimum value, variation, average, standard deviation etc.
–>TRADITIONAL DIAL CHANGE-OVER SYSTEM
Dial changeover systems make change the test load easily by turning the dial.
Accordingly the design is dust-proof including the weights for test load.
–>APPLICABLE TO CE AND SAFETY
Safety design applicable to EU low voltage command, EMC command and machine command. In addition to high-rigidity body , overturn-preventive metal fittings are attached as standard to prevent overturning by earthquakes etc.
Product information
Digital Rockwell Hardness Tester
DIGITAL ROCKWELL HARDNESS TESTER

FEATURES
SPECIFICATION
| ITEM | RMT-1 | RMT-3 | ||||||
|---|---|---|---|---|---|---|---|---|
| Minor load | 98.07 N | 29.42N | 98.07 N | |||||
| 10kgf | 3kgf | 10kgf | ||||||
| Test load | RMT-1 | 588.4 | 980.7 | 1471 | N | |||
| 60 | 100 | 150 | kgf | |||||
| RMT-3 | 147.1 | 294.2 | 441.3 | 588.4 | 980.7 | 1471 | N | |
| 15 | 30 | 45 | 60 | 100 | 150 | kgf | ||
| Minor load position setting | Automatic setting (LCD graph and electronic signal monitoring fine adjustment is unnecessary.) | |||||||
| Load control | Automatic (Loading --> holding --> release) | |||||||
| Start operation | Automatic start/ Manual start selection | |||||||
| Dwell time | 1~99 sec | |||||||
| Plastic measurement | Standard function, time up to hardness value display after release: 1 to 99sec | |||||||
| Scale display | C D A G B F K E H P M L V S R | 15N 30N 45N 15T 30T 45T 15W 30W 45W 15X 30X 45X 15Y 30Y 45Y C D A G B F K E H P M L V S R |
||||||
| Data output | 1) Centronics (standard) 2) RS232C or serial output selectable (Factory setting: RS232C) |
|||||||
| Data memory | Max. 256 test data | |||||||
| Hardness conversion | Specified scale on real time display. | |||||||
| OK/NG criteria | Upper and lower limits setting, and HI/OK/LOW display. | |||||||
| Data edition | Batch conversion of memorized data. (Max.value, Min.value, dispersion ( R ), mean value) Converted values, same too. |
|||||||
| RS232C Communication line | Baud rate: 1200/ 2400/ 4800/ 9600 bps selectable Error detection, Parity even/ Parity none/ selectable |
|||||||
| Accuracy | Conform to JIS B7726 and ASTM E-18 | |||||||
| Max.specimen height | 250mm | 200mm | ||||||
| Max.specimen depth | 165mm | |||||||
| Dimensions | W220 x D540 x H830mm | |||||||
| Weight | Approx. 80kg | |||||||
| Power supply | Single phase AC100~240V 50/60Hz available for export models. | |||||||
STANDARD ACCESSORIES
| ITEM | RMT-1 | RMT-3 | |
|---|---|---|---|
| Hardness standard block | 80HR30N | --- | 1 |
| 75HR30T | --- | 1 | |
| HRC60 | 1 | ||
| HRB90 | 1 | ||
| Diamond indenter (Built in) | 1 | ||
| Carbide indenter (1/16" Ø) | 1 | ||
| Spare carbide ball (1/16" Ø) | 5 | ||
| Anvil | 60MM Ø flat | 1 | |
| V-SHAPE | 1 | ||
| Lighting device (LED: green) | OPTION | ||
| Spare fuse 100~120V 3A, 200~240V 2A | 2 | ||
| Power cord (3P-2.5m) | 1 | ||
| Level adjusting leg | 4 | ||
| Auxiliary tools | 1 | ||
| Attachment for prevent the machine fall | 2 | ||
| Machine cover | 1 | ||
OPTIONAL ACCESSORIES CO
| ITEM | CONTENTS |
|---|---|
| Steel ball indenter | 1/8"Ø , 1/4" Ø, 1/2" Ø, 3/4" Ø |
| Steel ball | 1/8"Ø , 1/4" Ø, 1/2" Ø, 3/4" Ø |
| Round table | 200 Ø not tempered |
| Anvil | V-shape (small), Spot, Diamond spot |
| Long specimen testing jig | Vari-rest |
| Jack-rest | |
| Micro test table for jominy test | Max. movement: Approx, 55mm |
| Min. micro graduation: 1/10mm or 1/160" | |
| Printer iDP-3110 | Form Hardness tester adds up to result to data output |
